
Using jQuery and AJAX to dynamically update a page
AJAX is a technique that allows to change parts of a web page without refreshing it, thus allowing a better user experience. Google maps provide a good example of using AJAX, because the transition between the many maps in the service is done by refreshing only the necessary part of the page, and without the need for refreshing the entire page.
AJAX is powered by data requests that continuously flow from the browser to the server, which returns the required information. It is done in the following way. A javascript code on the browser listens to a browser event (like clicking on a button or hovering over an image), and when the action is performed, the javascript code sends a request for a data to the server. The server processes the information, and sends the requested data back to to the browser.
The javascript required for AJAX can be made simple by jQuery methods. In this tutorial, I explain and demonstrate the method jQuery.post. The server side script is written in PHP.
 method to perform AJAX")
The jQuery.post() method
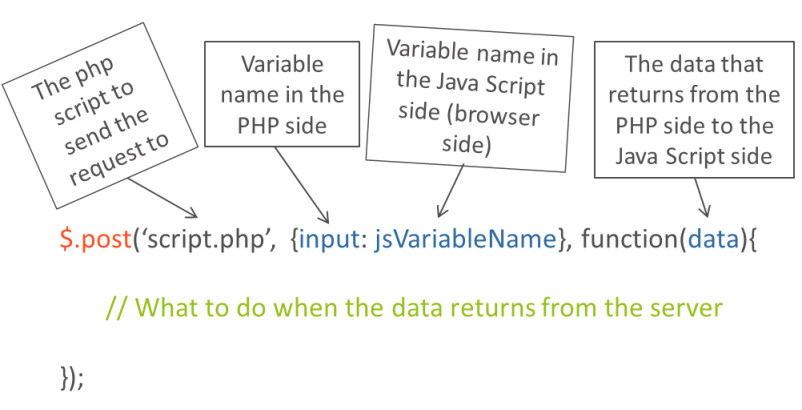
$.post method (short for jQuery.post) contains the following parts:
- The name of the server side script. For example, a PHP script.
- An object which assigns the names of the variables that the javascript sends to the name of the variables which are posted to the server side. In this example, the object is {input: getContent}, and it assigns the javascript variable getContent to a variable named input which is sent to the server.
- A code to execute when the data is sent back from the server to the browser.
Example for using jQuery.post() in a script
The code in the tutorial generates a simple select list that enables the user to select which image to see without having to refresh the page. Push the button to see the code in action.
Running the script requires a website on a web server (for example, you can run a WAMP server on your computer). These are the files you will need to create inside your site's folder:

- ajax.js is the javascript file.
- script.php is the php file.
- index.php holds the html to present to the users.
- images folder with 2 images : blue.png and red.png
index.php
The file index.php holds the HTML that includes:
- Form to select the images.
- A paragraph in which the image will be embedded.
- Including javascript scripts: the jquery library and our script.
<!doctype html>
<html lang="en">
<head>
  <meta charset="utf-8">
  <title>jQuery.post tutorial</title>
</head>

<body>
  <!--The form contains a select list of the images-->
  <form>
    <p>Choose which image to see : </p>
    <select id='select'>
      <option value="red">Red image</option>
      <option value="blue">Blue image</option>
    </select>
  </form>

  <!--The images will be presented here-->
  <p id="feedback"> </p>

  <!--The scripts-->
<script src="https://ajax.googleapis.com/ajax/libs/jquery/1.9.1/jquery.min.js"></script>
<script src="ajax.js"></script>
</body>
</html>
PHP script that runs on the server (script.php)
The script contains an array with the names of the images. When the users select one of the images, the script runs, checks if the image exists in the array, and prints the image back to the browser. If the image does not exist, the script presents an error message.
<?php
// An array with the names of the images.
$images = array("red", "blue");


// Was the form submitted?
if(!empty($_POST['input']))
{
  // $type is the variable that stores the data that was sent from the browser.
  // htmlentities() is used for security reasons.

  $type = htmlentities(strtolower($_POST['input']));

  // if the image exists in the array
  if (in_array($type, $images ))
  {
     // the $image_name variable stores its’ full name with extension.
    $image_name = 'images/'. $type.'.png';
    // and the script echoes the image.
    echo '<img src=" '.$image_name.' ">';
  }
  else
  {
    // An error message.
    echo 'There is no image with this name. Please choose another image.';
  }
}
?>
The jQuery script that connects the server with the browser (ajax.js)
The javascript script listens to the form, and when the user selects one of the options, the script calls the function loadContent(), and passes to it the user's choice (the image that the user wishes to see). The function uses the jQuery.post method to post the data to the server’s side (the PHP script), and receives the results that the php script echoes back from the server to the browser.
<script>
// Listens to the event that is trigerred by the user selecting the image in the form, and calls the function with the option that the user selected.
$("#select").on('change', function(){
  var selected = $(this).children(":selected").val();
  //Calls the function and passes to it the selection as a parameter.
  loadContent(selected);
});


// A function that uses jQuery.post to transfer the selected option to the server side, and returns the data back from the server.
function loadContent(selected){
  var feedback = $('#feedback'),
  getContent = selected;
  //post
  $.post('php/input.php', {input : getContent} , function(data) {
    //Takes the data returned from the server and embeds in the HTML.
    feedback.html(data);
  });
}


//Calls to the function when the page loads.
$(window).on('load', loadContent('red'));
<script>