למידת מכונה: סיווג תמונות באמצעות מודל VGG16 (חלק ב) - הבניית התיקיות
סדרת מדריכים זו מדגימה transfer learning שהיא ענף של למידת מכונה המתמקד בשימוש בידע שנרכש תוך פתרון בעיה אחת לפתרון בעיה קשורה אחרת. במדריך זה, נלמד לייעד מחדש מודל VGG16 כדי שיוכל להבחין בין תמונות כלבים לחתולים במקום בין כל 1000 הקבוצות שאותם למד המודל לסווג במקור.
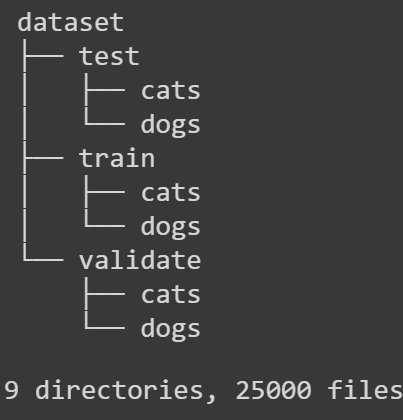
מדריך זה ממשיך את המדריך הקודם בסדרה על transfer learning בלמידת מכונה שבו למדנו להוריד את התמונות מ-Kaggle. במדריך הנוכחי נסדר את התמונות בתיקיות בהתאם למבנה הנדרש על ידי Keras. שלוש התיקיות ימלאו את החלוקה המשמשת למידת המכונה train, validate, test. כל אחת מהתיקיות תכלול 2 תיקיות משנה, כל אחת שייכת לאחת משתי הקטגוריות, cats ו-dogs.
להלן מבנה התיקיות שאליו נגיע בסיום המדריך:

להורדת קוד הפרויקט שאותו נפתח במדריך
דרישות מקדימות ומבנה התיקיות
את העלאת מאגר התמונות מ-Kaggle הסברתי במדריך קודם שאותו אתם מוזמנים לקרוא כאן.
בכל יתר המדריך נעבוד רק עם תיקיית train שהורדנו ממאגר המידע כי היא מכילה מספיק תמונות (25000) בשביל תהליך הלמידה וגם בגלל שהתמונות מסווגות בניגוד לתיקיית test שבה התמונות אינן מסווגות.
# the original images
# here I use only the images from the train folder
# for the 3 groups: train, validate and test
# because of of the large number of images (25000)
# and the fact that the images are classified.
# I won't use the 'test1' folder for the rest of the experiment.
# in the rest of the experiment I will refer to the 'train'
# as the 'ori_dir' (=original directory)
ori_dir = './train'
#dir_test  = './test1'
שיניתי את הפונקציה המשמשת להדפסת התמונות כדי שתוכל להציג כל מספר של תמונות במקום 4 בלבד בפונקציה המקורית:
# visualize the images
import matplotlib.image as mpimg

# Create figure with a specified number of subplots
def plot_images(images, labels, sp=3):
  fig, axes = plt.subplots(sp,sp)
  fig.subplots_adjust(hspace=1, wspace=0.3)

  for i, ax in enumerate(axes.flat):
    # Plot image
    ax.imshow(mpimg.imread(images[i]))

    # Plot label
    ax.set_xlabel('Label : %s' % labels[i])

  plt.show()
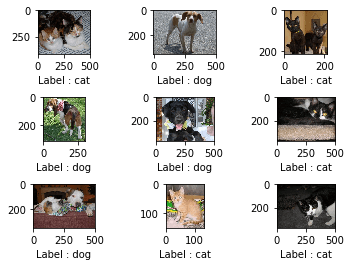
נציג 9 תמונות אקראיות מתוך התיקייה ori_dir בטרם עשינו על התמונות כל מניפולציה.
# visualize random images in the ori_dir
img_paths = []
img_labels = []

for i in range(9):
  # pick 9 random ids from the dataset
  rand_id = np.random.randint(0, file_count_train)

  # get the img path from the id
  filename = df.loc[rand_id, 'filename']
  path = os.path.join(ori_dir, filename)
  img_paths.append(path)

  # get the img label from the id
  img_label = df.loc[rand_id, 'category']
  if img_label == 1:
    img_labels.append('dog')
  else:
    img_labels.append('cat')

plot_images(img_paths, img_labels)
נראה טוב מלבד הגדלים של התמונות מאחר שמודל VGG16 שבו נשתמש בהמשך מצפה לתמונות בגודל 224 על 224.
כדי לשנות את גודל התמונות ל 224 על 224 עם רקע לבן כפיצוי נתחיל מיצירת תיקיה 'resized' שבה נשים את התמונות לאחר תהליך העיבוד.
!mkdir -p resized/אפשר ליצור תיקייה באופנים שונים. משום שמדריך זה פותח על ממשק colab אני משתמש ב-terminal שלהם להוספת התיקייה.
הפונקציה הבאה מעבדת את התמונות לגודל של 224 על 224 עם רקע לבן, ומעבירה את התמונות המעובדות לתיקייה 'resized':
from PIL import Image

# resize with white background instead of missing pixels
def resize_with_white_background(path_ori, path_dest):
  img = Image.open(path_ori)

  # resize and keep the aspect ratio
  img.thumbnail((224,224), Image.LANCZOS)

  # add the white background
  img_w, img_h = img.size
  background = Image.new('RGB', (224, 224), (255, 255, 255))
  bg_w, bg_h = background.size
  offset = ((bg_w - img_w) // 2, (bg_h - img_h) // 2)
  background.paste(img, offset)
  background.save('resized/' + path_dest)
נריץ את הפונקציה:
# install a progress meter
!pip install tqdm
from tqdm import tqdm

# run the function to resize all the images in the 'ori_dir'
for item in tqdm(df['filename']):
  file = ori_dir + '/' + item
  resize_with_white_background(file, item)
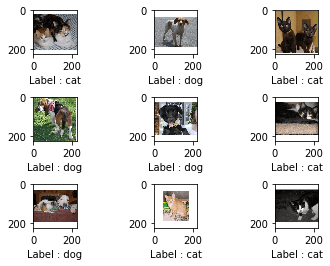
נחזור ל- 9 התמונות האקראיות אותן הצגנו, והפעם נציג אותן לאחר תהליך העיבוד:
# plot the same images after the resize step
# and from the 'resized' folder
img_paths_resized = []

for idx, path in enumerate(img_paths):
  img_paths_resized.append(path.replace("./train/", "./resized/"))

plot_images(img_paths_resized, img_labels)
רק מהסתכלות בפלט לעיל נראה שהגודל הוא הגודל הנכון, ובכל זאת נוודא את הגודל של התמונות בדרך נוספת:
# confirm the size of the resized images
im = Image.open(img_paths_resized[0])
resized_size = im.size
resized_size
(224, 224)
נהדר! המודל VGG16 מצפה לתמונות בגודל 224 על 224.
נחלק את התמונות בין 3 תיקיות: 'train', 'validate', 'test'. כל תיקייה צריכה להיות מחולקת ל-2 תיקיות משנה 'cats' ו-'dogs' על פי דרישות ממשק Keras.
נתחיל מיצירת מבנה התיקיות עבור מערך התמונות.
!mkdir -p dataset/

!mkdir -p dataset/train/
!mkdir -p dataset/train/cats/
!mkdir -p dataset/train/dogs/

!mkdir -p dataset/validate/
!mkdir -p dataset/validate/cats/
!mkdir -p dataset/validate/dogs/

!mkdir -p dataset/test/
!mkdir -p dataset/test/cats/
!mkdir -p dataset/test/dogs/
כדי לראות מבנה התיקיות נתקין ואף נשתמש בכלי של הטרמינל ששמו tree:
# visualize the directory structure
!apt-get install tree
!tree dataset
נפריד את תמונות הכלבים מהחתולים ב-dataframe:
# separate the dogs from the cats in the dataframe
filtered_cats = df[df.category == 0]
filtered_dogs = df[df.category == 1]ל-sklearn יש פונקציה מצוינת שבה נשתמש לצורך הפרדת ה-dataframe ל-3 קבוצות הנתונים : אימון, וידוא ומבחן.
מכיוון שהפונקציה יודעת להפריד רק ל-2 קבוצות אבל אנחנו צריכים להפריד ל-3 קבוצות נפעיל את הפונקציה פעמיים.
נתחיל מלהפריד ל-3 קבוצות נתונים של חתולים
# split to train, validate and test folders with the help of sklearn
# each split is to 2 groups
# so we need 2 splits in order to split to 3 groups
from sklearn.model_selection import train_test_split

# the first split is to cats_test and the rest of the images
cats_train_valid, cats_test = train_test_split(filtered_cats, test_size=0.1, random_state=1)

# how many cats in the test set?
cats_test.shape[0]
1250
# the second split on the cats_train_valid folder separates to 2 folders: train and valid
cats_train, cats_valid = train_test_split(cats_train_valid, test_size=0.2, random_state=1)

# how many cats in the train and valid?
print(cats_train.shape[0])
print(cats_valid.shape[0])
9000 2250
נסכם. 9000 תמונות בסט האימון, 2250 תמונות בסט הוידוא ועוד 1250 בסט המבחן. חלוקה של 72% 18% ו-10%. זה נחשב ליחס סביר כי המומלץ הוא לחלק ביחס של 70% : 20% : 10%. עם כי צריך להתאים למה שעובד עבור כל מקרה בנפרד. במקרה שלנו זה עובד היטב כפי שנראה בהמשך.
עכשיו נפצל את הנתונים עבור הכלבים באותו היחס:
# split the dogs dataset to the same ratio
dogs_train_valid, dogs_test = train_test_split(filtered_dogs, test_size=0.1, random_state=1)

dogs_train, dogs_valid = train_test_split(dogs_train_valid, test_size=0.2, random_state=1)
כל מה שעשינו עד כה היה פיצול dataframe של pandas. בשלבים הבאים ניצור את מערך התיקיות שמכיל את התמונות שבהם נשתמש בהמשך הניסוי על ידי העתקת התמונות לתוך התיקיות.
אחרי כל צעד נוודא שהתמונות אכן נמצאות במקום המיועד:
# everything that we did so far was splitting the pandas' dataframe
# in the following steps we'll create the actual dataset
# by copying the images into the dataset folders

import shutil

# create the dataset by distributing the images to 3 folders: train, validate, test
# each containing 2 subfolders: cats and dogs
for item in cats_train['filename']:
  ori = 'resized/' + item
  dest= 'dataset/train/cats/' + item
  shutil.copy(ori, dest)
# validate
!ls ./dataset/train/catsfor item in cats_valid['filename']:
ori = 'resized/' + item
dest= 'dataset/validate/cats/' + item
shutil.copy(ori, dest)!ls ./dataset/validate/catsfor item in cats_test['filename']:
ori = 'resized/' + item
dest= 'dataset/test/cats/' + item
shutil.copy(ori, dest)!ls ./dataset/test/catsfor item in dogs_train['filename']:
ori = 'resized/' + item
dest= 'dataset/train/dogs/' + item
shutil.copy(ori, dest)!ls ./dataset/train/dogsfor item in dogs_valid['filename']:
ori = 'resized/' + item
dest= 'dataset/validate/dogs/' + item
shutil.copy(ori, dest)!ls ./dataset/validate/dogsfor item in dogs_test['filename']:
ori = 'resized/' + item
dest= 'dataset/test/dogs/' + item
shutil.copy(ori, dest)!ls ./dataset/test/dogsנגדיר את הנתיבים לתמונות בתיקיית dataset:
# paths to the datasets
train_path = 'dataset/train/'
valid_path = 'dataset/validate/'
test_path  = 'dataset/test/'
במדריך הבא המוקדש ל-transfer learning נבצע את תהליך הלמידה בפועל.
לכל המדריכים בסדרה על למידת מכונה
אהבתם? לא אהבתם? דרגו!
0 הצבעות, ממוצע 0 מתוך 5 כוכבים


המדריכים באתר עוסקים בנושאי תכנות ופיתוח אישי. הקוד שמוצג משמש להדגמה ולצרכי לימוד. התוכן והקוד המוצגים באתר נבדקו בקפידה ונמצאו תקינים. אבל ייתכן ששימוש במערכות שונות, דוגמת דפדפן או מערכת הפעלה שונה ולאור השינויים הטכנולוגיים התכופים בעולם שבו אנו חיים יגרום לתוצאות שונות מהמצופה. בכל מקרה, אין בעל האתר נושא באחריות לכל שיבוש או שימוש לא אחראי בתכנים הלימודיים באתר.
למרות האמור לעיל, ומתוך רצון טוב, אם נתקלת בקשיים ביישום הקוד באתר מפאת מה שנראה לך כשגיאה או כחוסר עקביות נא להשאיר תגובה עם פירוט הבעיה באזור התגובות בתחתית המדריכים. זה יכול לעזור למשתמשים אחרים שנתקלו באותה בעיה ואם אני רואה שהבעיה עקרונית אני עשוי לערוך התאמה במדריך או להסיר אותו כדי להימנע מהטעיית הציבור.
שימו לב! הסקריפטים במדריכים מיועדים למטרות לימוד בלבד. כשאתם עובדים על הפרויקטים שלכם אתם צריכים להשתמש בספריות וסביבות פיתוח מוכחות, מהירות ובטוחות.
המשתמש באתר צריך להיות מודע לכך שאם וכאשר הוא מפתח קוד בשביל פרויקט הוא חייב לשים לב ולהשתמש בסביבת הפיתוח המתאימה ביותר, הבטוחה ביותר, היעילה ביותר וכמובן שהוא צריך לבדוק את הקוד בהיבטים של יעילות ואבטחה. מי אמר שלהיות מפתח זו עבודה קלה ?
השימוש שלך באתר מהווה ראייה להסכמתך עם הכללים והתקנות שנוסחו בהסכם תנאי השימוש.